Axpert 11
TStructs (Forms)
- Create Form
- Create DC
- Create Fields
- Grid DC/frames
- Formulae in fields
- SQL in fields
- Drop down fields
- Autogenerate fields
- Table fields
- File upload fields in forms
- Photos &Image fields
- Barcode /QR Code Scanner
- Fill Grid
- Posting data – Gen maps
- Updating fields in DB tables – MD Map
- Toolbars in tstructs
- Tracking changes/Audit trial
- Try it yourself
IViews
Scripts
Axpert Jobs
Axpert Cards
HTML Plug-ins
Users & Roles
- Users, roles & responsibilities
- Responsibilities
- User Role
- User Login
- SSO Authentication
- Stay Sign In
Workflow
Axpert API
Application Var/Params
Publish Axpert Apps
Axpert Mobile
Settings
- Axpert installation
- Change password
- Forgot Password
- Developer Options
- Global Settings
- In-Memory DB
- Notifications for Long Running Webservice’s
- Axpert Configuration on web
- Axpert Licensing
Utilities
Customization
- Main Page Customization
- Home Page Customization
- More API
- Custom User Interface
For Reports - Custom HTML In Forms
- CSS And JS Customization
- Developer Notes
- Hooks In Forms
- Third Party SSO Integration
WebServices
Axfast
Axpert jobs
Axpert Jobs are defined to run scheduled background jobs. Background jobs can be configured to run on a specific day or in specified time intervals. Use the Axpert Jobs option in the Axpert Developer site to create an Axpert Job. The function that is to be performed by a job is defined as a script.Scripts can be used to
-
- Import data
- Export data
- Upload/download files
- Call third party API
- Run Database procedures
- Push Notifications
- Send Emails
And much more…
All these functionalities are available as Axpert functions. Refer to the General functions section on Scripts page to understand more on this topic.
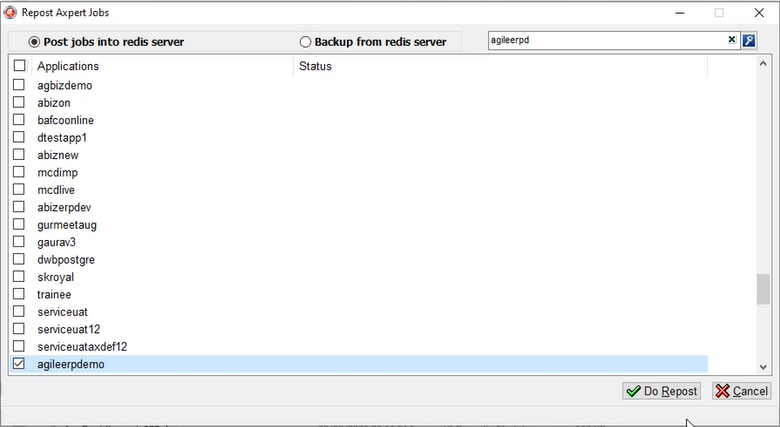
Axpert Repost Jobs
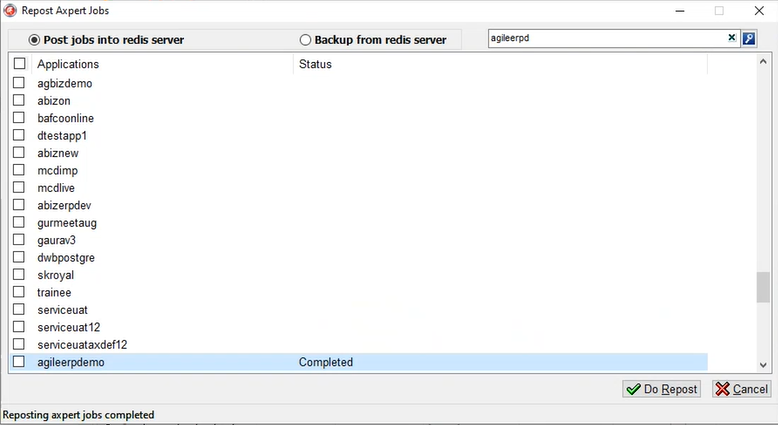
Select the schema or app name from the list in the application, then click on “Do repost” to update the axpert jobs.
This will execute the job that is defined in the job definition table and generate the data according to the definition. A message “completed” appears after a successful repost.
A job is created and pushed into redis, if the job is being executed for the first time.
NOTE: We provide Redis information in the config.ini file, which is where the data is retrieved and connected to the specific project. The project table’s information is retrieved and then pushed into Redis.
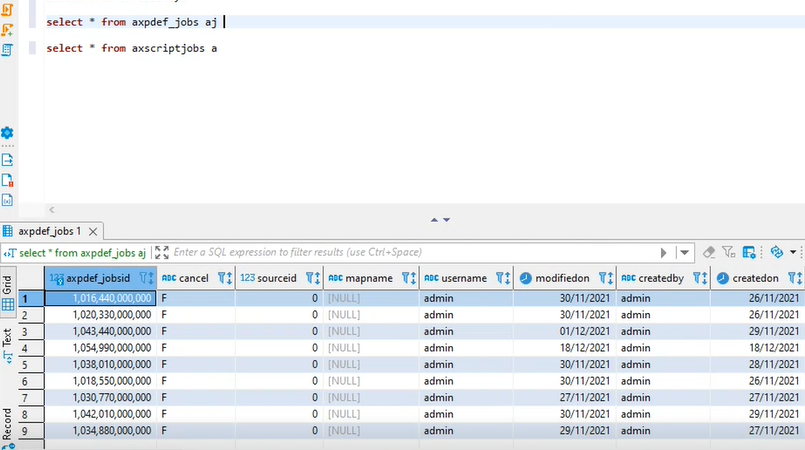
In DBeaver, open the schema which is to be reposted. Check the number of jobs being executed. These jobs will be reposted with the click of a button in Axpert repost jobs exe.
For example, axdef_jobs table will display the number of axpert jobs that are defined and executed in the schema. The current example has 9 jobs in total.
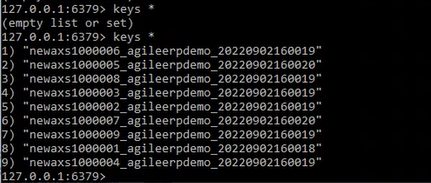
You can now traverse to the Redis prompt and check for the executed jobs by using the keys * command. This will display the list of jobs as shown below.
To avoid missing scheduled jobs in the system a backup of the details of the axpert job can be taken. Choose the backup option on the right and click on “Do Backup” on Axpert repost jobs.exe.
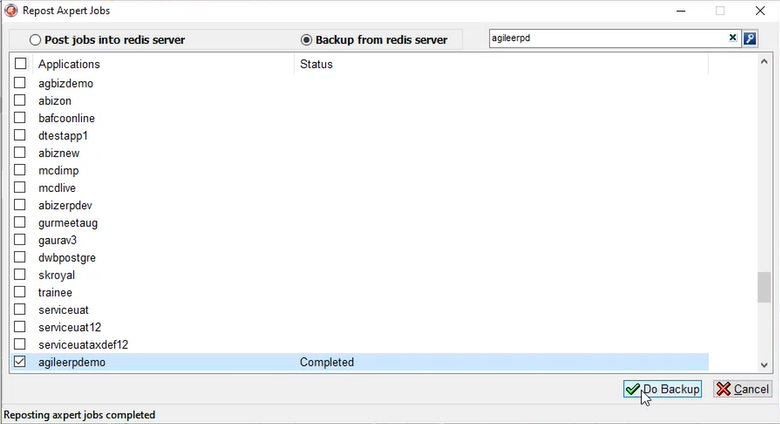
Whenever a job is created a record is inserted into axrediskeys table. First, the axpert jobs are created and go through the record set in the table. The job name from the table is matched with the axrediskeys table values.
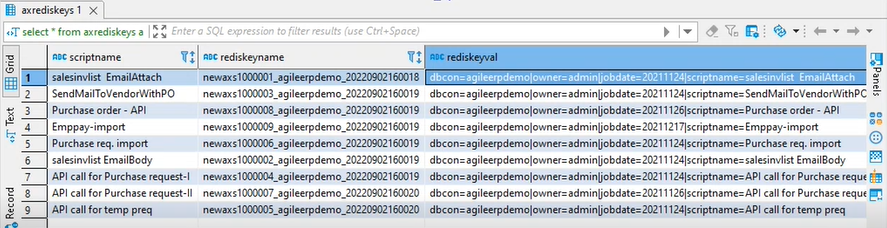
If the Redis key name is present, then the rediskeyname and rediskeyval are pushed into Redis. A backup of this entry is stored on Redis.