Axpert 11
TStructs (Forms)
- Create Form
- Create DC
- Create Fields
- Grid DC/frames
- Formulae in fields
- SQL in fields
- Drop down fields
- Autogenerate fields
- Table fields
- File upload fields in forms
- Photos &Image fields
- Barcode /QR Code Scanner
- Fill Grid
- Posting data – Gen maps
- Updating fields in DB tables – MD Map
- Toolbars in tstructs
- Tracking changes/Audit trial
- Try it yourself
IViews
Scripts
Axpert Jobs
Axpert Cards
HTML Plug-ins
Users & Roles
- Users, roles & responsibilities
- Responsibilities
- User Role
- User Login
- SSO Authentication
- Stay Sign In
Workflow
Axpert API
Application Var/Params
Publish Axpert Apps
Axpert Mobile
Settings
- Axpert installation
- Change password
- Forgot Password
- Developer Options
- Global Settings
- In-Memory DB
- Notifications for Long Running Webservice’s
- Axpert Configuration on web
- Axpert Licensing
Utilities
Customization
- Main Page Customization
- Home Page Customization
- More API
- Custom User Interface
For Reports - Custom HTML In Forms
- CSS And JS Customization
- Developer Notes
- Hooks In Forms
- Third Party SSO Integration
WebServices
Axfast
Global Settings
Global settings allow the configuration of technical parameters for establishing a connection to the ERP system and the configuration of business parameters for customizing the interface and the behavior of the application. Configuration of an application deals with handling of numerous usage controls, which can be switched off or switched on, so as to balance its functionalities to extant needs.In global settings you can make changes in applications, Forms, Reports, Page Builder and Globalization.
Contents
Application Settings
Enable Breadcrumb
These features will allow you to show the root path of the forms or reports as a caption in the header of forms and reports.
To enable this feature
- Goto Setting –> Global settings.
- In application Tab, Enable Breadcrumb.
- It will ask you to clear In-memory DB.
- Click on Confirm.
- Click on Save, logout and login to the application.
All the changes will reflect in the entire application.
Enable Direct Db call
Direct DB calls are supported for basic iviews, if enabled the iviews will be loaded faster than in normal mode.
To enable this feature
- Goto Setting –> Global settings.
- In application Tab, Enable Direct Db call.
- Click on Save, logout and login to the application.
All the changes will reflect in the entire application.
Allow Change Password on first time login
New users in the application will be redirected to ChangePassword page on first-time login.
To enable this feature
- Goto Setting –> Global settings.
- In application Tab, Enable Allow Change Password on first time login.
- Click on Save, logout and login to the application.
All the changes will reflect in the entire application.
Session Auto Extend
Session extension will display a message to the user about his session being expired. The user can then choose to extend or sign out.
To enable this feature
- Goto Setting –> Global settings.
- In application Tab, Enable Session Auto Extend.
- Click on Save, logout and login to the application.
All the changes will reflect in the entire application.
Disable Split
By enabling disable split option, it will disable split functionality.
To enable this feature
- Goto Setting –> Global settings.
- In application Tab, Enable Disable Split.
- Click on Save, logout and login to the application.
All the changes will reflect in the entire application.
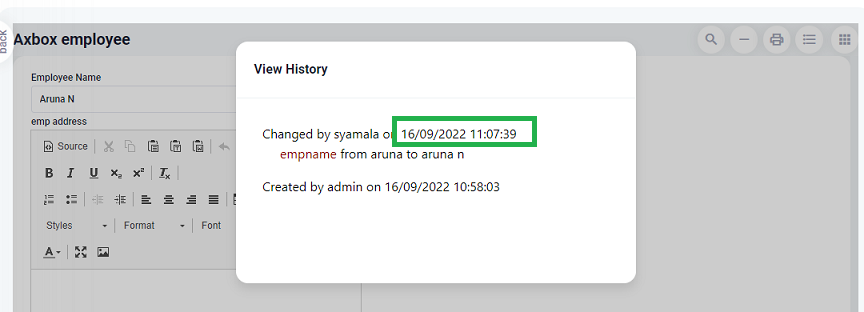
Allow Timezone Variation
- Goto Administrator console –> Settings.
- In the Application Tab, Enable Allow timezone variation.
- Click on Save, logout and login to the application
The changes will reflect in the application.
For example, in a form, if you modify an entry from a different location/credential and view its history, it will display the server date & time during the modification.
Global Search Fetch Limit
This feature will allow you to set the search data to fetch limit.
To enable this feature
- Goto Setting –> Global settings.
- In application Tab, enter value in Global Search Fetch Limit text field.
- Click on Save, logout and login to the application.
All the changes will reflect in the entire application.
Hide Error Messages
This feature will allow you to to configure Error messages to close automatically after the configured seconds.
To enable this feature
- Goto Setting –> Global settings.
- In application Tab, enable Hide Error Messages.
- Alert message error/failure timeout in seconds will be enabled, enter value in seconds.
- Click on Save, logout and login to the application.
All the changes will reflect in the entire application.
Enable Submit and Cancel buttons in Tstruct Footer
This Option will allow the toolbar buttons will be enabled only if choosen. It will show you Submit and Cancel button on all forms.
To enable this feature
- Goto Setting –> Global settings.
- In application Tab, enable Submit and Cancel buttons in Tstruct Footer.
- Click on Save, logout and login to the application.
All the changes will reflect in the entire application.
Alerts Timeout in seconds
This option will allow you to configure Alerts to close automatically after the configured seconds.
To enable this feature
- Goto Setting –> Global settings.
- In application Tab, enter time in seconds in the text field.
- Click on Save, logout and login to the application.
All the changes will reflect in the entire application.
Wizard Type
This option is provided to change the wizard DC interface, it has Classic and Modern interface. For more details refer [Wizard_DC| Wizard DC]
To enable this feature
- Goto Setting –> Global settings.
- In application Tab, select classic or modern from the drop down list.
- Click on Save, logout and login to the application.
All the changes will reflect in the entire application.
Background Image
It will allow you to upload an image or video for sign-in the page background. For video Maximum size allowed should be 10 MB and the format should be mp4 and for Image Maximum file size allowed is 5 MB and the format should be gif, png, jpg, or jpeg.
To enable this feature
- Goto Setting –> Global settings.
- In application Tab, upload a image/video file.
- Click on Save, logout and login to the application.
All the changes will reflect in the entire application.
Mobile Background Image
It will allow you to upload an image for the sign-in page background on mobile. Maximum Mobile Background Image Size should be 1 MB and format should be gif, png, jpg, jpeg.
To enable this feature
- Goto Setting –> Global settings.
- In application Tab, upload an image file.
- Click on Save, logout and login to the application.
All the changes will reflect in the entire application.
Logo
It will allow you to upload a logo image for an application. Maximum Logo Size should be 1 MB and format should be gif, png, jpg, jpeg
To enable this feature
- Goto Setting –> Global settings.
- In application Tab, upload an image file.
- Click on Save, logout and login to the application.
All the changes will reflect in the entire application.
Application Languages
You can select the defined language under application language. You can select any language and the selected language will show you in login page.
To enable this feature
- Goto Setting –> Global settings.
- In application Tab, select the language which you want to select.
- Click on Save, logout and login to the application.
All the changes will reflect in the entire application.
Forms Settings
Development Instance
This feature will allow you to fetch the data directly from the database. If you make any changes in forms/reports then all the changes will come reflect in web without clearing the In-memory DB.
To enable this feature
- Goto Setting –> Global settings.
- In forms Tab, Enable Development Instance.
- Click on Save, logout and login to the application.
All the changes will reflect in the entire application.
Save and Auto Publish
These features will enable the Save and Auto Publish option in Design mode.it will help you to save and publish in single click.
To enable this feature
- Goto Setting –> Global settings.
- In forms Tab, Enable Save and Auto Publish.
- Click on Save, logout and login to the application.
All the changes will reflect in the entire application.
Attachments Size
Here you can select Maximum file size for attachments. File size has direct impact to upload performance, it is recommended to use File size less than 10 MB.
To enable this feature
- Goto Setting –> Global settings.
- In forms Tab, select size for attaching file in Attachments Size.
- Click on Save, logout and login to the application.
All the changes will reflect in the entire application.
Enable Design Mode (Please select the responsibilities)
‘Design Mode’ in forms will be enabled for users having any of the selected responsibilities(to enable this feature node should be connected).
To enable this feature
- Goto Setting –> Global settings.
- In forms Tab, select the responsibility which you want to give access.
- Click on Save, logout and login to the application.
All the changes will reflect in the entire application.
Reports Settings
Enable Column word wrap
This feature will wrapped iview column text, else it will display in single line.
To enable this feature
- Goto Setting –> Global settings.
- In Report Tab, enable Column word wrap.
- Click on Save, logout and login to the application.
All the changes will reflect in the entire application.
Page Builder Settings
Page builder access (Please select the responsibilities)
This feature will show page builder option for the user, selected responsibilities will be allowed to build their own home page.
To enable this feature
- Goto Setting –> Global settings.
- In Page Builder Tab, select responsibilities from Page Builder Settings.
- Click on Save, logout and login to the application.
All the changes will reflect in the entire application.
Maximum number of widgets in page builder
This feature will allow you to add numbers of widgets you want to add in page builder.
To enable this feature
- Goto Setting –> Global settings.
- In Page Builder Tab, enter number of widgets to show in homepage.
- Click on Save, logout and login to the application.
All the changes will reflect in the entire application.
Globalization Settings
App Title
You can add/change the application title to overwrite the existing title from global setting.
To enable this feature
- Goto Setting –> Global settings.
- In Globalization Tab, Enter application title to overwrite the existing title.
- Click on Save, logout and login to the application.
All the changes will reflect in the entire application.