Axpert 11
TStructs (Forms)
- Create Form
- Create DC
- Create Fields
- Grid DC/frames
- Formulae in fields
- SQL in fields
- Drop down fields
- Autogenerate fields
- Table fields
- File upload fields in forms
- Photos &Image fields
- Barcode /QR Code Scanner
- Fill Grid
- Posting data – Gen maps
- Updating fields in DB tables – MD Map
- Toolbars in tstructs
- Tracking changes/Audit trial
- Try it yourself
IViews
Scripts
Axpert Jobs
Axpert Cards
HTML Plug-ins
Users & Roles
- Users, roles & responsibilities
- Responsibilities
- User Role
- User Login
- SSO Authentication
- Stay Sign In
Workflow
Axpert API
Application Var/Params
Publish Axpert Apps
Axpert Mobile
Settings
- Axpert installation
- Change password
- Forgot Password
- Developer Options
- Global Settings
- In-Memory DB
- Notifications for Long Running Webservice’s
- Axpert Configuration on web
- Axpert Licensing
Utilities
Customization
- Main Page Customization
- Home Page Customization
- More API
- Custom User Interface
For Reports - Custom HTML In Forms
- CSS And JS Customization
- Developer Notes
- Hooks In Forms
- Third Party SSO Integration
WebServices
Axfast
Posting data – Gen maps
Genmaps are defined as part of tstructs. These are used to post data into another tstruct/form. The tstruct in which the genmap is defined is called the source tstruct. The tstruct to which data is posted is called the target tstruct. When data is entered in the source form and saved, data is automatically posted into the target tstruct/form. When data is edited, deleted, or canceled in the source, the corresponding changes are applied in the target too.
A field in the target may be mapped to a field in the source. So, when a transaction is posted from source to target, the mapped field values are copied from source to target. Not all fields in the target may be mapped. The autogenerate fields, fill fields, expression fields & SQL fields in the target will be auto-populated. The validations in the target will be performed. In case of an exception in the target, the source transaction also will not be saved.
Example 1:
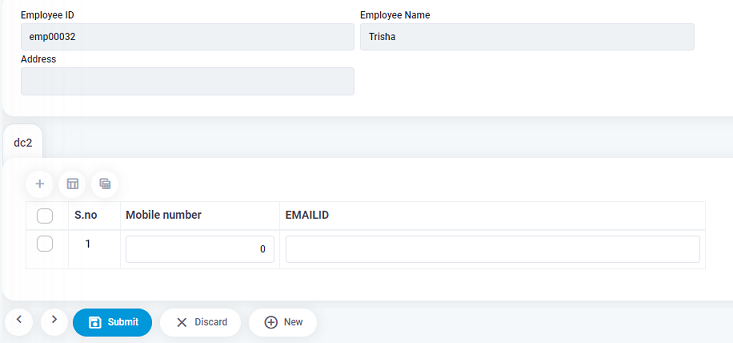
Consider a tstruct that captures details about a customer. In the same application, let us create another form in which all contacts are stored. When a customer is created, the contact person names are posted to the contacts form.
Customer form
| Name | Details |
|---|---|
| Cname | Customer Name |
| Address | Simple text field with 250 char width |
| City | Drop down from city master |
| URL | |
| ContactPerson | Name of the contact person |
| CPEmail | Contact person email address |
| CPMobile | Contact person mobile |
| CPDesignation | Drop down from designation master |
Contact form
| Name | Details |
|---|---|
| ContId | Autogen number |
| ContDate | Expr – Date(). This fills today date in this field. |
| ContactName | Name of contact person |
| ContactEMail | Contact person email address |
| ContactMobile | Contact person mobile |
| OrgName | Name of organization |
| Desig | Designation of the person. |
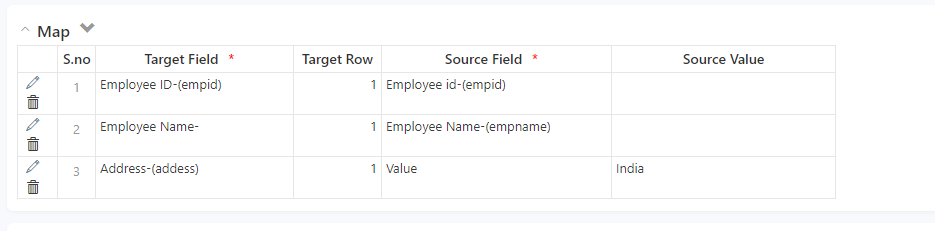
Whenever a customer is created a record should be added to the contact form. To, achieve this define a Genmap as below:
- Name – Post to contact
- Post type = post one transaction in target
- Post event = default
- Map (Target=Source)
- ContactName = ContactPerson
- ContactEmail = CPEMail
- ContactMobile = CPMobile
- Orgname = CName
- Desig = CPDesignation.
The contID and ContDate are automatically filled with appropriate values when a record is posted into contact tstruct.
NOTE: Genmap Nomenclature
The genmap is named as “Tstruct ID + Number”. For the first genmap in the form, the name will be “tstructID1”. We cannot change the genmap name but can change the genmap caption.
Contents
Post multiple records into target
Select Post one transaction for every row in a grid DC option in Post type property. In this case, for every row in the source selected grid DC, a row will be posted in the target.
Example 2:
| Name | Details |
|---|---|
| Cname | Customer Name |
| Address | Simple text field with 250 char width |
| City | Drop down from city master |
| URL | |
| DC2 | Contacts grid DC. Users may enter many contact persons for one customer |
| ContactPerson | Name of the contact person |
| CPEmail | Contact person email address |
| CPMobile | Contact person mobile |
| CPDesignation | Drop down from designation master |
To post one record for every contact person in the DC2 of customer form, set the post type as Post one transaction for every row in DC2. The rest of the Genmap definition will be the same as given in Example 1.
Post data On Approve or Reject
If the form is eligible for a workflow and has to post data only on approval or rejection then, select the approve or reject option in the drop-down.
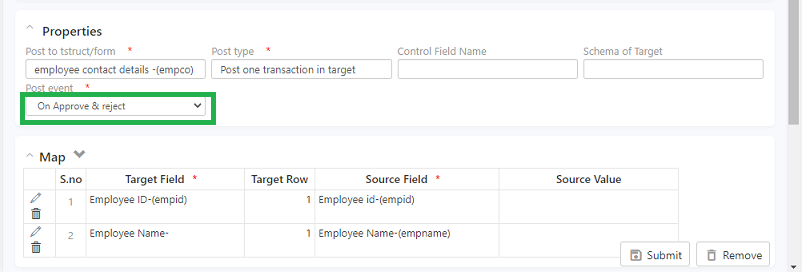
NOTE: If you have multiple genmaps in a form, set the respective gen map as Active.
Login to the run site, enter data into the form, and submit. On Submission click on listview and check if the data is posted. The data entry is not posted as it is waiting for approval.
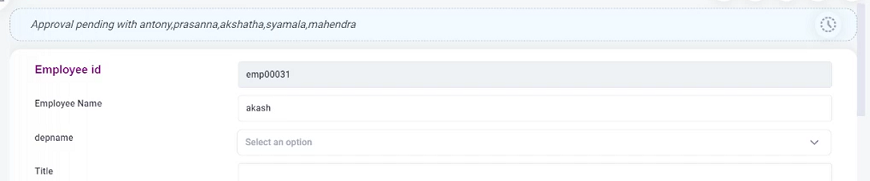
Login with manager credentials to proceed with the approval. Click on the pending icon on the top right to approve or reject the request
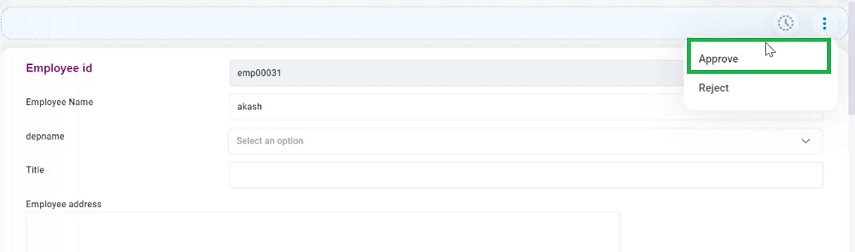
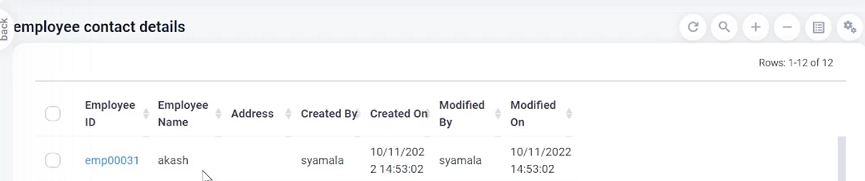
On approval or rejection the data will be posted and available in listview
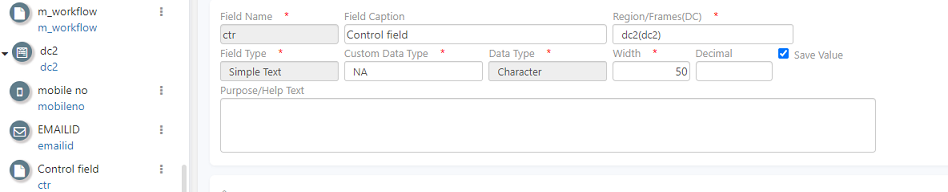
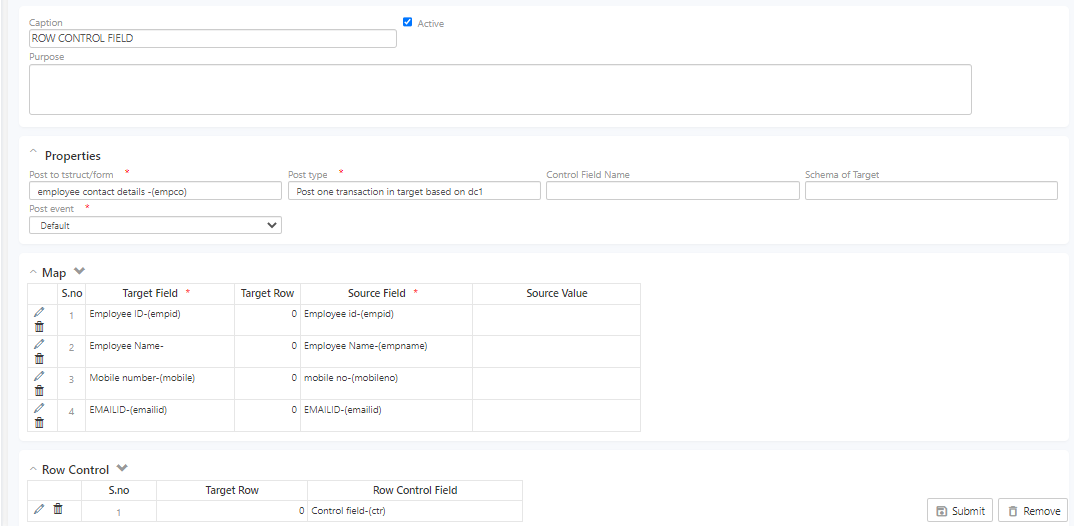
Control field
A control field controls the Genmap posting. This is a field in the source tstruct. The Genmap will be posted only if this field value is T.
Example 3:
In Example 2, consider a case when only contact persons whose designations are Manager or General manager are to be posted to the contacts form. To do this, add a field in DC2 named, CanPost. This should be an expression field with :
- iif(CPDesignation={Manager} | CPDesignation={General manager}, {T}, {F}) – This expression will return T if designation is Manager or General manager else it will return F.
Set this field as control field in the Genmap. So, only rows in the DC2 that have the given designations are posted to the target.
If customer data is edited and saved in customer form, automatically the changes will be posted to the contacts form. In case the designation is changed to a manager or general manager from any other designation while editing customer data, a new record will be posted to the contacts form. In case a designation is changed from manager to executive while editing customer data, the already posted record in the contacts form will be deleted.
To enable the control field posting of data, create a control field definition with a simple text field type.
On creation, go to the genmap and set the target and source fields along with the row control field and save the structure.
Go to the run site and make an entry specifying the control field.
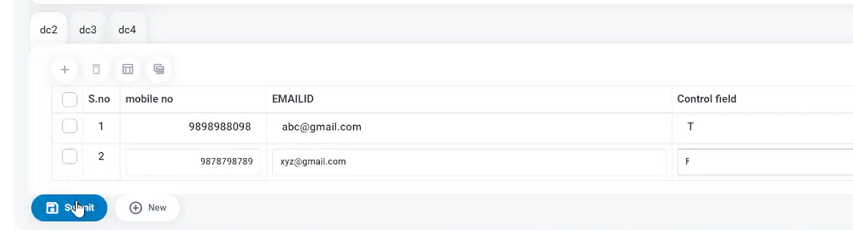
Now, go to the target form and check the entries.
There is one entry with mail ID and contact number
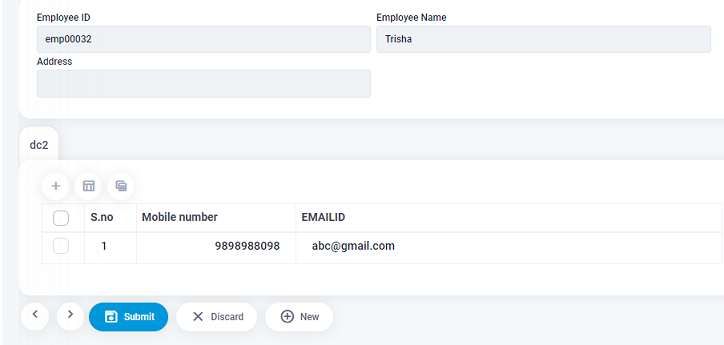
And, an entry without posting the data.
Posting from a grid in source to a grid in target
Consider a tstruct that has a grid and the target transaction also has a grid. Set the post type to Post one transaction in target. Map grid fields in target to grid fields in source. Set the target row as zero for all grid fields. In this case, one transaction is posted in target for every record in the source. Every row in grid DC in the source is added as a row to the grid DC in the target. A grid field in the target may be assigned to a non-grid field in the source too. Grid fields in target cannot be mapped to fields from 2 different grid DCs in the source.
Group field
This is used when data from a grid DC in the source is posted into grid DC in the target. When a group field is set, the rows are grouped based on the value in the group column. For each group, a row is added to the grid DC in the target. Numeric fields that are mapped from source grid to target grid are cumulated group-wise and posted into the target grid.
Posting to specific rows
There may be a need when a grid in the target tstruct should be filled with a fixed set of rows, The data may need to be posted from the source into a grid that is expected to have a prefixed number of rows. In this case, for each cell, the target grid can be addressed by selecting the target field and setting a target row. When Genmap posts data into the target the rows are added as defined in the map.
Mapping constant values
Some fields or cells in the target may need to be filled with static values. The values are hardcoded in Genmap. This can be done by selecting %value in the source field. Enter the static value to be assigned in the Source value in the map.
Use %grid value when assigning a value to a grid field in target in the case when rows from a source grid are copied. Use $ID in case a hardcoded recordid value is to be assigned to a normalized drop-down field in the target.
The mapping of constant values functionality may be better achieved by setting the constant value in a field in the source using an expression and assigning this field to the target.
Try Out
Post data using genmaps, when a new user is created map the user ID, role, employee name, start date into the user login form.