Axpert 11
TStructs (Forms)
- Create Form
- Create DC
- Create Fields
- Grid DC/frames
- Formulae in fields
- SQL in fields
- Drop down fields
- Autogenerate fields
- Table fields
- File upload fields in forms
- Photos &Image fields
- Barcode /QR Code Scanner
- Fill Grid
- Posting data – Gen maps
- Updating fields in DB tables – MD Map
- Toolbars in tstructs
- Tracking changes/Audit trial
- Try it yourself
IViews
Scripts
Axpert Jobs
Axpert Cards
HTML Plug-ins
Users & Roles
- Users, roles & responsibilities
- Responsibilities
- User Role
- User Login
- SSO Authentication
- Stay Sign In
Workflow
Axpert API
Application Var/Params
Publish Axpert Apps
Axpert Mobile
Settings
- Axpert installation
- Change password
- Forgot Password
- Developer Options
- Global Settings
- In-Memory DB
- Notifications for Long Running Webservice’s
- Axpert Configuration on web
- Axpert Licensing
Utilities
Customization
- Main Page Customization
- Home Page Customization
- More API
- Custom User Interface
For Reports - Custom HTML In Forms
- CSS And JS Customization
- Developer Notes
- Hooks In Forms
- Third Party SSO Integration
WebServices
Axfast
Smartviews
Additional features introduced in List views and IViews with the same user experience are called Smartviews. Below are the features implemented.
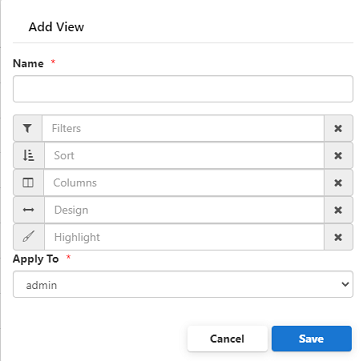
Views
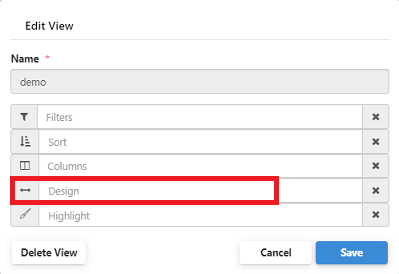
Views are representations of smart view functionalities clubbed into a single view. Go to the run site and open a Tstruct for which you want to add views. Click on the List view option at the top right. Next, Click on the Data icon on the top right to add view.

The view functionalities include the following options as shown in the image.
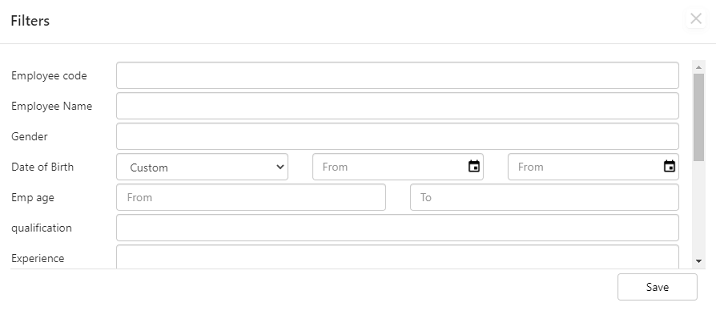
To fetch details based on field names, sorting data using column names is enabled by views. For Example, create a view to filter all the details of
Male employees and display them as “demo”. To achieve this click on the filter option and select the desired field name from the list. Click on
save and give an appropriate Name for the view.
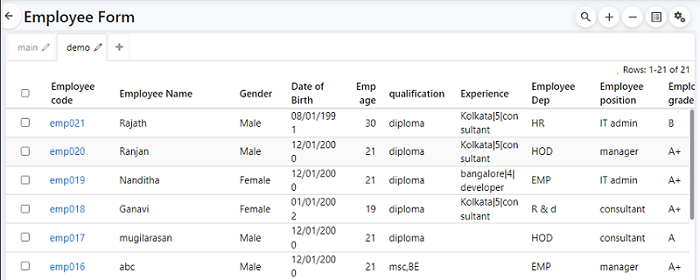
After applying the filter the list will be displayed as shown below
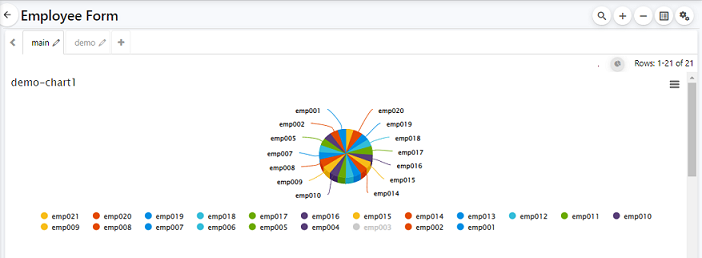
Charts
Charts are used to graphically represent and add value to your reports by giving clarity and condensing a large amount of data. Smartviews allows you to add multiple charts to display data.
To create a new chart for your form go to List view and click on the chart option under the data section on the top right as shown below.

Next, select the type of chart you want to create and give a suitable name. Select the column and value you want to display using charts and click on Save.
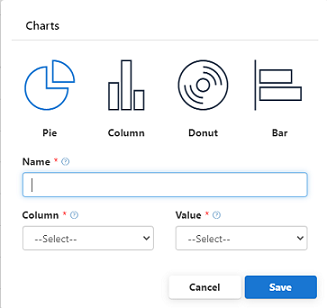
The chart will be displayed along with the list. To add multiple charts for the same form click on the chart option and follow the steps as above.
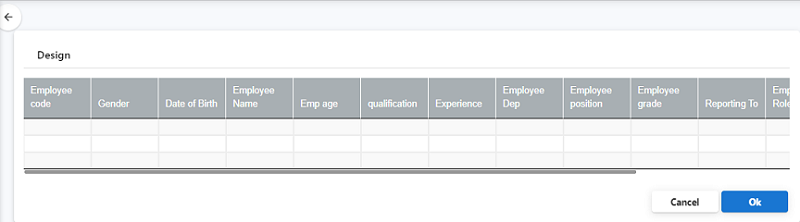
List View Designer
To enhance user experience in list view a design option is provided. Using this the columns can be resized and moved as desired.
One can drag and drop items to rearrange or resize column width and click on OK
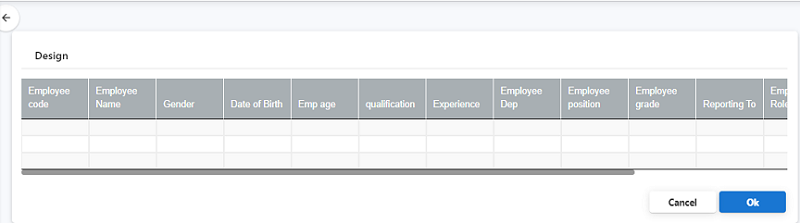
For example, Move the Employee Name field after Date of Birth.
Download files from Iviews
Download the file/attachments in IViews when provided the mapped path. To achieve this, below iview configuations needs to be applied.
Concerned Iviews should have the following columns by default.
-
- transid: transid of the tstruct
- If isdbattach column value is true then transid column value should be (“transid+fieldname”)
- If isdbattach column value is true and is db attachment is header attachment then only “transid” should be passed
- fieldname: field name in tstruct(to be kept empty for header attachment)
- recordid: transaction record id
- isdbattach: this is an optional column which determines wheater the attachment is db attachment or file attachment, if the attachment type is db attachment then this column value should be true
axp_attach (can be any one of following):
- Text to be shown on download hyperlink (this column is a flag to enable/disable attachments component)
- Grid attachment name (value of grid attachment)
- Full mapped path if transid, fieldname, recordid is not provided
- ResolvePathForTemplates : “resolve attachment path” property is used for iview templates in case of resolving image path to show image in iview templates. “Resolve attachment path” Advanced Setting configuration property with property code as “resolve attachment path” to be added as true or false.
Note:
If File Server and App Server are different systems, then File Server needs to be authenticated for downloading or uploading the files with the following Application Variables, provided both servers should be in the same domain.
- axp_mapusername
- Username for the domain
- axp_mappwd
- Password for the domain
- axp_domain
- Domain Name
Example:
DB Attachment
select 'gddwn' transid_real,gddwn1id recordid,'dc2_image' fieldname,dc2_image axp_attach,'gddwndc2_image'transid, 'true' isdbattach from gddwn2
Non DB Attachment
select null transid_real,gddwn1id recordid,null fieldname,replace(axpfilepath_img,'*','')||axpfile_img axp_attach,null transid, 'false' isdbattach from gddwn1
DB + Non DB Attachment
•	select 'gddwn' transid_real,gddwn1id recordid,'dc2_image' fieldname,dc2_image axp_attach,'gddwndc2_image'transid, 'true' isdbattach from gddwn2

union all

select null transid_real,gddwn1id recordid,null  fieldname,replace(axpfilepath_img,'*','')||axpfile_img axp_attach,null transid, 'false' isdbattach from gddwn1